Archive for 2012

Sawyer Squeeze Filter Modifications Part 2 – Cleaning Syringes and Storage Bag

Wednesday, September 12th, 2012

The Sawyer Point One Squeeze filter (0.1 micron version) has grown to be one of my favorite pieces of gear.

There are two pages of modifications:

Ok, so you’ve done Part 1. This now lets you do part 2, and fixes what is in my opinion the single weakest part of the Sawyer Squeeze design, the backflushing syringe they include. First, the one they provide is really big. Second, it doesn’t seat nicely into the clean end of Sawyer Squeeze, you have to sort of press it on.

However, have no fear, that’s an easy problem to solve.

Changing Irrigation Syringes – On Trail And Home Use

[Update: do not follow this suggestion, I have reconsidered this question and this is a bad idea, use either 60ml syringe for maximum 2oz flow for about 1 second, or use nothing. Use of smaller syringes can lead to filter tube channeling, which is not reparable). The long tip 60ml however works very well, and is highly recommended.

I had a brain storm (too bad it was wrong, see note above), and realized I should check for smaller or better fitting irrigation syringes. That’s what that big thing is, with the plunger. After discovering that big pharmacy chains were totally useless and didn’t carry such things, I went to an old local store, Johnson’s Medical Supply in Berkeley, if you live in a larger city, you almost certainly have a true medical supply store. NOT, repeat, a junk filled big box chain place, it’s a store dedicated to only medical supply products.

(more…)

Simple Modifications for Sawyer Squeeze Filter – Prefilter, hose adapter, evernew water bladder

Thursday, August 16th, 2012

The Sawyer Point One Squeeze filter (0.1 micron version) has grown to be one of my favorite pieces of gear.

There are two pages of modifications:

Before I get into the mods, check out this video of the Sawyer Squeeze Filter in operation out in the wilds (The Cascades, by Portland, Oregon).

You can see the modifications in action there.

Use a scoop, not the bag

Even though this seems pretty obvious, if you try to fill the dirty bag from Sawyer directly, you’ll note that unless you have a waterfall of some size, or rapids, you’re not going to get that bag filled. Unless, of course, you use a scooper of some sort. In that video, I used a trimmed down cheap water bottle, but you can use a cut off Sawyer 16 ounce bag, or your drinking cup. No matter what you do, it’s not a bad idea to rinse out the scoop with some clean water before storing it between uses.

(more…)

Making an ultralight priming pan for your alcohol stove

Wednesday, June 20th, 2012

Today I’ll show you how to make an ultralight alcohol stove priming tray for your alcohol stove. Certain types of alcohol backpacking stoves need priming, in this case, I’m using a penny stove that I made a while ago. A fine stove, although hard to make.

A priming tray makes it a lot easier to start these things up, and saves a bit of fuel, but please be careful because you are placing fuel almost directly on the ground, so make sure to clear the spot you are going to use your stove on very thoroughly to avoid fires! The tray also fits snugly under the base when the stove is stored in the pot when packed away.

Today’s project is a companion to the making a (titanium) pot stand article.

Making a priming tray is very easy, and can be done with only a knife or scissors, but you get a cleaner result with some plyers. But you can make one using just your fingers and some way to cut out a rectangle from an aluminum can. I made two, one to carry as a spare since it’s so light it might blow away by accident.

This tray weighs a mighty 0.3 grams. So I made an extra one to keep as a spare. The entire setup (stove, stand, tray) in the above picture weighs exactly 28 grams, ie, just under an ounce. But I do carry a spare priming tray and a spare penny, since penny stoves require pure copper pennies, pre 1982 that is, to work properly, newer ones are too light.

Tools and Materials

This is easy, and you can get the stuff anywhere.

  1. A rectangle of aluminum from a can, about 1.75 (1 3/4) inch by 1.25 (1 1/4) inch. This holds plenty of alcohol to prime a stove. Don’t use aluminum foil, it’s too flimsy and might start leaking out alcohol on the ground after a while.
  2. Scissors to cut this rectangle. Or a knife, if you are going ultralight and have no scissors.
  3. Plyers. I used two kinds, regular flat ended and needle nose, but you don’t need that unless you have them lying around, which of course any self-respecting do it yourselfer should.

That’s it, I told you this would be a basic project.

How to Make the Priming Tray

Here’s the steps, in pictures, to make the tray. Explanations follow each picture.

(more…)

Making an ultralight titanium pot stand for your alcohol stove

Sunday, May 6th, 2012

Today’s project is pretty easy. This is actually the second stand I made, the first was done in a similar manner, but used some old stainless steel bicycle spokes I had lying around. This project is a companion to how to make an alcohol stove priming tray article.

This stand when done will weigh 12,5 grams. The stove weighs about 15.5 grams. With thinner titanium, it would weigh a bit less. And yes, this stuff really works. The stove, stand, priming tray, and penny, weigh in at exactly 28 grams, just under an ounce that is. I carry an extra priming tray and penny, plus of course the windshield and pot and all that.

My entire solo cook set weighs in currently at about 10oz, that’s stove, stand, pot, pot cozy, 2oz alcohol fuel bottle, some condiments/containers and teas, and a spoon. For longer trips, I’d bring a soda bottle for more alcohol, carry that outside the pack of course.

When built in this way, the stand will support pretty much any pot made, from smallest to biggest, within reason of course. 2 liters at least anyway.

Stand Materials and Tools

  • The main component, some type of metal rod. You can get stainless steel bicycle spokes at most local bike shops. 15 gauge are fine, but make sure they are straight gauge, not the more normal 15/17. 16 gauge are also probably strong enough I’d say, and will be lighter, but are harder to find. You can usually buy these singly from quality bike shops. The steel they use in stainless bike spokes is very strong and hard to bend/cut.

    For this project, however, a member of backpackinglight.com was nice enough to sell me some spare titanium rod he had available. Since selling the raw material isn’t his main thing (he sells his own pot stands, Zia, using a different design and method for construction) you’ll have to find your own sources if you want to use titanium.

    The rods I used were 0.10 and 0.06 inch in diameter. I used the thicker for the two parts that actually hold up the pot, and the thinner for the connector piece that completes the triangle.

    After seeing how the materials handled, I think a 0.08″ titanium rod would do quite well for all the legs, and would be solid enough for most pots.

  • Two thicknesses of aluminum tubing. I got these from the hobby metals rack at Ace Hardware stores. Always support Ace Hardware, and other locally run and owned hardware stores please, plus Home Depot has zero clue about what you are talking about if you ask them for something like this. I took the rods I was going to use and selected the tubing inner diameter to get as close a fit as possible. Sometimes you may have to slightly flatten the tube to get both rods inserted, depends on the diameter of the rods. In my case, the 7/32″ (stock number 105) and 5/32″ (stock number 103) were perfect fits for two diameters of .1″ and .1 + .06″ respectively.

That’s it for the materials. Titanium is way easier to bend and cut than stainless steel bike spokes, by the way. I used a heavy set of pliers, a vice, and a hack saw to cut the thicker rod ends. plus a file to smooth off the cut ends.

Titanium also has a real positive side affect, aside from being sort of neat and hip, it cools almost instantly, making those burned fingers I’d get from touching the stainless steel pot stand a thing of the past. Steel holds the heat a lot longer. These things get hot by the way, very hot, red hot at times. To me that’s the real advantage of using titanium rod over stainless steel bike spokes.

I also made a template which you’ll see below that had all the key measurements on it to avoid error.
(more…)

How to Sew a Silnylon Stuff Sack for Terra Nova Laser Competition

Saturday, February 4th, 2012

The following is a photo how-to on sewing a silnylon stuff sack. In this project, we’ll be making the blue stuff sack, which will replace the hugely oversized original green one.

The dimensions here will be for the Terra Nova Laser Competition tent, but just change to suite your needs for any other stuff sack, there’s nothing specific at all about this to that tent except the dimensions.

Making a New Stuff Sack for your Laser Competition

So you’ve got your new Laser Competition tent. Now it’s time to change a few things. First, let’s get rid of that big stuff sack, which is much bigger and heavier than it needs to be (about 22 grams, compared to the 10 to 12 grams this stuff sack will weigh. Since Terra Nova supplies a tent pole bag and stake bag, I put the stake, or nail, bag, into the pole bag, then stick both into a side backpack pocket. Then we’ll create a small stuff sack that fits the tent, a light ground cover, plus the attached cuben fiber pole sleeve cover I showed you how to make, and which takes a lot less room in your pack, and weighs less as well. The final dimensions of this bag will be about 5.5″ X 10.5″. If you want it a bit roomier, just add one inch to the height of the bag.

Important: Remember to either remove or fold in half the two carbon fiber end poles when using a smaller stuff sack!! They are easy to reinsert, and if you just fold them in half, and leave them in, that’s even easier. But do it however you like, just don’t try to fold the tent up to stick in this stuff sack with them at standard length.

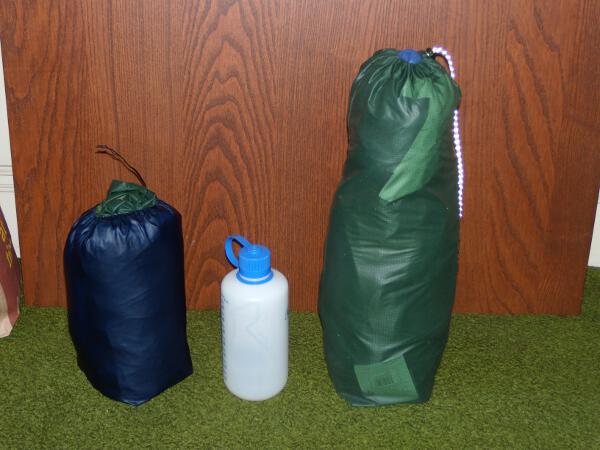
You can see the huge difference in size in the above picture, the new stuff sack is half the volume of the original Laser Competition stuff sack. That’s a 1 liter/quart Nalgene water bottle for size comparison.

I’ve also sewn pole and stake/peg/nail sacks, which weigh either less or the same as the Terra Nova supplied ones, except they have drawcords, like this bag. The only differences between those and this one, aside from the dimensions, are that they have a single side seam, and no squared off bottom, ie., they are a simple envelope shape, but the rest of the sewing process is exactly the same as given here.

Basics of Stuff Sack Construction

This style is the basic method, and doesn’t use a sewn in rounded bottom, so you have to add in the folds you’ll sew in on the bottom of the bag to square it off when figuring out your dimensions.

Remember: circumference is equal to diameter desired X 3.14 (pi), plus 1 1/8″ for the seam allowance.

Height is about the desired height of the final bag, plus 1/2 the diameter for the bottom, and about 1/2 the diameter for the top. Remember that the channel requires about 1.5″ inches extra material on the top.

Sewing is in several stages: 1. top right and left corner diagonals created to form channel reinforcement and entry points. 2. Channel itself is sewn, with tucked under 1/4″ to create a clean edge and avoid loose edges that can fray. 3. First seam, that creates the tube, done with bag turned inside out. 4. Second seam, which is pinned with bag turned back to normal, as a flat felled seam, then the bag is reversed, inside out again, so you can sew it from the inside. 5. Stitch along bottom edge. 6. Fold over this edge, and sew through it again to reinforce it. 7. Sew two corners, with bag inside out, to form a sort of square on the bottom when it’s full.

The last step is to thread cord into channel, and then add cord lock.

Materials

  • Quest Outfitters – Silnylon Seconds 1.1 oz / yd silnylon. Note, that they don’t include the silicone weight, so the real weight is around 1.4 oz/yd. The quality of the silnylon doesn’t matter a lot here, and the cheaper stuff actually tends to be a bit lighter. Seconds are also fine for such projects, and they are cheaper.

    For this project, we’ll use a piece 14.5″ X 18.25″

  • ZPacks 80 pound polyester cord I like the 80 pound cord, it’s totally adequate for most stuff sacks, and is really light. By the way, get a lot of this, I always order too little, and am always running out, 5 or 10 yards should keep all your stuff sacks happy.
  • Zpacks Tiny Cord Locks Same for the Tiny Cord Locks, they work great with these narrow cords, and don’t weigh anything. Tiny is a size, smaller than the Mini, which is way too big for very thin cord. Order a bunch of these, you’ll probably want to replace most of your drawcords with this and the 80 pound cord once you see how light it is.

I use Gutterman thread, which is easy to find, but any quality polyester thread should be fine. But Gutterman is well regarded and reliable, the thin kind for this project, and most silnylon and light fabric projects.

When sewing silnylon, use the smallest needle you can manage, I used a #10 (70) needle. And sew slowly, otherwise the material tends to slip out of control, resulting in either really tiny stitches, or simply losing control of the seam altogether.

You should also have very sharp scissors. A good piece of advice I got was to use one pair only for fabric, not paper or other stuff, ie, have a dedicated, very sharp pair of scissors for your sewing. You can sharpen real steel scissors if you are careful using a honing rod if you have one, for knife sharpening, just make sure you are at the right angle to the actual cutting edge, which is quite steep, not like a knife.

Sewing the Stuff Sack

Ok, we’re ready to go now.

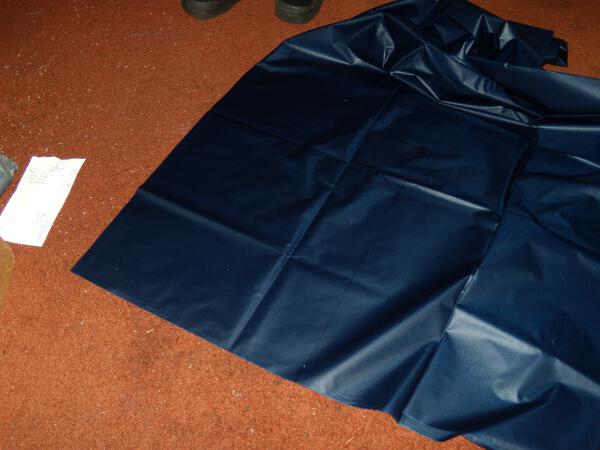
To get the right size, I’ll measure then cut a rectangle of silnylon, 14 1/2″ by 18 1/4″.

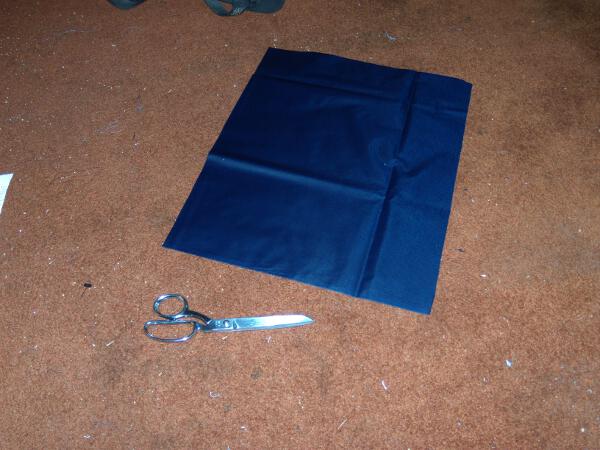
There is the rectangle, cut out and ready to be sewn.
(more…)