Archive for 2013

Making a Simple Lightweight Backpacking Alcohol Stove Wind-Heat Screen out of Flashing

Thursday, August 15th, 2013

This article is part of a related series of fuel/stove articles:

One of the keys to efficient boiling/cooking with alcohol stoves is the stove screen/heat shield. There are several components to constructing an efficient stove system, and the most important one is the wind/heat screen.

This screen will work well with Sgt. Rock’s Ion stove or Mark Jurey Penny Stove, or most other types, and should get you close to the maximum efficiency you can get with a flat rolled screen. For other options, see cone type screens and bent in screens (like FlatCat Gear uses). I wanted something a bit simpler than these types of screens however, one that rolls up neatly inside your pot, slots into itself with no weird or unwieldy connector methods.

I have to thank Sgt. Rock, who helped me figure out some of the intricacies of making an efficient stove. His Ion stove / screen / stand system still remains probably the most efficient and simple setup anyone has ever created.

This design is tested fairly extensively and is a little bit different, and more sturdy, than what Sgt Rock has on his site, but the core ideas are the same.

Core Concepts and Goals of Efficient Screens

The ideas behind efficient screens are not that complicated, but some are a bit counter-intuitive.

  • Screen should be quite close fitting, about 1/4″ (6mm) from side of pot gap.
  • Screen should not be too tall. For most pots, 4″ (10cm) is about right.
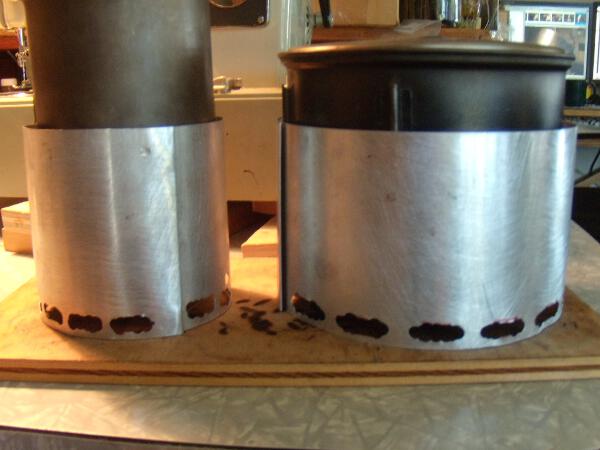
  • Critical: enough air must enter into burning chamber to allow fuel to not overheat. This is where many screens fail, including most of my earlier attempts, but I did not realize this was the cause. I discovered this by long trial and error, primarily by lifting up fresh, non-holed screens with paper clip legs, then noting that gave me the best efficiency by far of all methods I had tried. Then it was simple math to calculate how many total square inches of air inlet that roughly 1/8″ to 3/16″ (3-4mm) created, then to duplicate that with air holes. The reason you see somewhat jagged airholes on the following completed pictures is that I do not have a punch that creates long air holes, so I formed them by punching out holes, cutting between them with small scissors, then punching a few more pieces off. This creates a few issues with wind, that are however easily resolved.
  • The real key: the screen acts much more like a piston cylinder/carburator than a wind screen. The trick is to get the optimal air/fuel mixture, and to create the best burn chamber possible. This was the hardest point for me to understand, and it took a great deal of testing to confirm what sgt rock had told me via email about this question.

Furthermore, based on some touchy and slightly irksome designs I’d used before, I had the following practical goals for this screen design:

  • Screen should be made out of aluminum flashing, which is easy to get, and very strong, and can be stored inside the pot easily by rolling it up. This material is springy enough to where it generally opens fine to its desired diameter.
  • Screen should have a simple, essentially foolproof method of connecting the two ends. Since I’ve been sewing a lot, a bit of trial and error showed me that a basic flat felled type connection was perfect.
  • Screen should not require awkward storage methods, like most cones do, and should above all be as simple as possible, yet yield the most efficient boils possible, on par with something like the Caldera Cone.

After a decent amount of testing, here is a how to on constructing this screen.
(more…)

Fuel Consumption and Pack Weight for Alcohol – Esbit – Canister – White Gas Backpacking Stoves

Thursday, August 1st, 2013

There’s a lot of myths about fuel/stove weight for trip lengths of various days. This page compares consumption weights between several types of setups, over different time frames, using an easy to read table of weights per day/night of the trip, broken into stove / fuel types. As you will see in the table below, basically, an efficient alcohol/esbit stove system will always weigh less at all points of the trip, no matter how many days. This is because the container for canister stove gas weighs about the same as the gas, for 100gm containers, and about 2/3 of the net gas weight for 220 gm canisters.

This article first compared just gas canister to alcohol, but has been expanded to include Esbit and White Gas stove systems.

Of course, all this ignores the sheer silence, clean burning, and beauty of an alcohol stove, plus of course the simplicity, and super light weight of any decent alcohol stove setup, which is the real reason I like these things.

-> Go directly to fuel consumption/carry weight tables.

Basic Fuel Consumption/Pack Weights

See the full tables for fuel consumption/pack weight per day.

Short version, assuming 2 cups boiled two times a day, you will never carry more weight with an efficient alcohol/esbit stove, and you will only carry more weight with a less efficient one on the first day of a 12 day trip. You will basically never make up for the heavier canister container weight, and the heavier stove weight, and you will always never really know how much fuel you truly have left with the canister, whereas with the alcohol, you can very precisely measure out the fuel per boil, knowing exactly what you need to bring and what you can use per day.

Basic testing / efficiency parameters

Alcohol

Alcohol stove comparisons in this chart show two types, one, a very easy to make, fill, and light Ion type stove, and two, a less efficient stove, but faster boiling, like the Penny stove, that requires about 2/3 fluid ounce to boil 2 cups of water. Since a lot of people still use these less efficient alcohol stoves, I thought it would be fair to include that type in the weight comparisons.
(more…)

Make your own Ion Alcohol Fuel Stove – Half Ounce SLX 2 cups of water boil

Sunday, June 30th, 2013

stove pictures

This is the setup I am using for these tests, screen, 2″ pot stand, 1.25″ tall stove, 4″ wind / heat screen, and a 900 ml Snowpeak titanium tall pot. I have also tested on a 600 ml stainless steel pot and that also works, though not quite as well as the ti pot. These are further references you can use to help you create and build the stove/screen/stand:

Note, see below for pot stand dimensions for Ion stove, the version linked to above is taller and wider, for a Penny large stove.

Thanks to Sgt. Rock for his Original Ion Designs and Tests

Before I say anything more, I want to thank Sgt Rock, the creator of the Ion stove for his assistance, and for his generosity with his time and knowledge, in finally cracking the .5 oz boil barrier. Everything here is based on his work, including some tips he gave me via email which proved to be absolutely critical, plus a few pointers that might not be totally obvious from his how-tos in terms of how to make the screens and pot stands and stoves.

Stove Design Goals

Here were my design goals as they evolved over some trips using a Mark Jurey Penny Stove, in several versions, with a few heights of wind/heat screens, 5″ to 6″. Because the penny stove has some advantages in terms of speed and wind resistance that the Ion stove may not have, I will do another how to on the penny stove at a later date, but this how to is going to be about how to create a realworld stove that has the following qualities:

  1. First, and foremost: must boil water using a narrow pot, using no more than 15ml fuel.
  2. Next, must boil using standard denatured alcohols like SLX, which you can find at any hardware store and even some larger supermarkets. This is also the fuel you are most likely to actually find hiking in the US in trail towns, so making this a requirement makes sense, particularly when sgt rock noted that this is what he achieved his legendary 12ml / 2 cups boil Ion with a .9 liter wide pot, which I will discuss a bit more in the conclusion.
  3. Stove must be easy to light, and require no priming. The penny stove is not that hard to light once you learn how to do it, but it’s a bit too finicky for my taste, too much priming, and you lose fuel as it flares up, too little, and you have to redo it.
  4. Screen / heat shield must be easy to use and fit inside of pot without any excessive gymnastics.
  5. Uses a pot stand. This is a very core requirement, because almost all stoves that require priming and pressurization from the pot set on top of it are not only not super stable, but waste heat while you wait for the stove to heat up. The penny does not have this issue.
  6. As a sub-requirement, and as an outcome of approaching the 15ml goal, fuel for a week, real cooking, on a real trip, should fit in an 8oz container, ie, small, compact.
  7. To repeat, must do all this using a narrow pot (ie, a pot that is taller than it is wide), 600ml to 900 ml.
  8. Must work out of the workshop, ie, outside, in various temperatures. See fuel efficiency thread appendix on altitude and boil times/temps / water temperature.
  9. Must nullify any claimed weight advantage of using a non renewable cannister stove with higher BTU gas as fuel source.
  10. Screen must be easy to store in pot, and must allow connecting each end to the other without extra steps or tools. I used to use bolts to hold it together with wing nuts, but it was too finicky for my taste.
  11. Stand must fold up for storage in the pot without taking up any real room
  12. Light weight. But that’s a given, it’s going to be light.

Sparing you the suspense, all of these goals are now met. Short version: pick one, efficiency or speed. (However, in a future post, I will give a how-to for the amazing CHS stove, which actually is quite close to the efficiency of the ION, but almost 2x faster to boil).
(more…)

Alcohol fuel efficiency for backpacking stoves – ethanol vs methanol

Sunday, May 12th, 2013

I’ve been working on the problem of alcohol stove efficiency in my spare time, as a hobby, to relax from more pressing regular work matters, and I finally realized, the information on the internet is not very accurate, so I’m going to work out here the basic chemistry of alcohol fuel efficiency. My starting point was the very fine article on the Ion Stove by Sgt. Rock, which set me on my quest to get the actual data as closely as I could. If I make any errors in my calculations, do please post a comment of correction and I’ll update this posting.

While I might appear to get lost in the details, let me remind you of just why alcohol stoves are so lovely: they are silent. You can use any fuel, from toxic methanol to good quality ethanol in them, and they will still work, though of course you’ll need to carry about 20% more weight in fuel if you use a primarily methanol based fuel, as you will see as we do the calculations below. See appendix 1 for fuel types and how to get them. See appendix 2 for a table of fuel use / water starting temperature for ethanol and methanol.

The key point is that there is no such thing as ‘alcohol’, there are types of alcohol, and when you learn how to use your stove, and read how people get certain efficiencies, you need to be aware of significant differences in efficiencies, for example, ethanol, at 21.1 kjoules per ml, contains a whopping 33% more energy per ml than methanol, at 15.8 kjoules per ml. And, turning it around, methanol contains only 75% of the energy of ethanol. A blend like SLX probably contains around 18-19 kjoules / ml, though it could be less.

The basics – Joules to heat 1 pound of water

To make things easier, we are going to work from 2 cups of water, 16 oz, which weighs one pound. As always, we need to be clear on the units, we’ll be using 1 pound of water because 2 cups conveniently weighs 1 pound. wikipedia tells us that:

The British thermal unit (symbol Btu or sometimes BTU) is a traditional unit of energy equal to about 1055 joules, 1.054kj. It is the amount of energy needed to heat one pound of water by one degree Fahrenheit. In scientific contexts the Btu has largely been replaced by the SI unit of energy, the joule.

Appendix 4 shows some more conversion information for energy units.

For our purposes this is convenient. So 1 kj, actually 1.054 kj, heats one pound of water 1 degree F. 1 kj is about the energy released by one wooden match burning (pdf has energy content of many things, conversion units etc). However, it’s not quite that simple, since 2 cups of water weighs actually about 16.7 ounces by weight, ie, a bit more than a pound. Since 2 cups of water actually weighs 16.7 ounces, or 1.04375 pounds, this will throw off the following numbers for 2 cups slightly, but not a whole lot. However, all we need to do is multiply the total by 1.04375 to get the amount of fuel needed for the volume 2 cups, which is easy, so that’s what we will do below.

Energy content of ethanol

Sgt Rock lists the energy content per pound of ethanol as 12,550 btus per pound ie, 12,550btusx1.054=13,227 kj, and the energy content of methanol as 10,200 btus per pound (10,750 kjoules). First let’s check this. This source gives the energy content of ethanol as 23.4 MJ per kg. This comes from the IEA. Keep in mind that you can basically never find or buy 100% pure ethanol, all ethanols you will buy contain about 5% water, so that confused the matter. This pdf from ipst.gatech.edu for example lists it at 11,500 btus per pound. So clearly the first thing to do is find out what the actual energy content of 95% pure ethanol is. The question is made more difficult by the mix of units, ie, joules/btus per gallon (a volume measurement) vs joules/btus per pound, by weight, that is. So during this process we will need to find standard units to get things consisten.

The “heat content” of a gallon of ethanol is 76,000 British Thermal Units (BTU). But 1 BTU = 1054 joules, so the energy density (by volume) of ethanol is 21.2 kilojoules per cubic centimeter (aka, 1 ml).

Since the density of ethanol is 0.789 grams per cubic centimeter, the energy density of ethanol is 26.8 megajoules per kilogram. src

(more…)