Make your own Ion Alcohol Fuel Stove – Half Ounce SLX 2 cups of water boil

June 30th, 2013 by h2

stove pictures

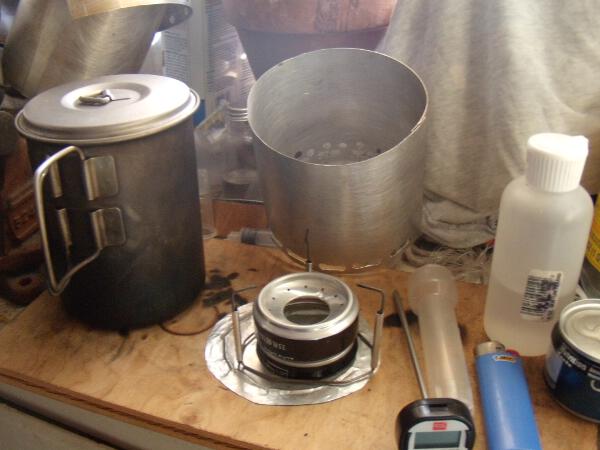
This is the setup I am using for these tests, screen, 2″ pot stand, 1.25″ tall stove, 4″ wind / heat screen, and a 900 ml Snowpeak titanium tall pot. I have also tested on a 600 ml stainless steel pot and that also works, though not quite as well as the ti pot. These are further references you can use to help you create and build the stove/screen/stand:

Note, see below for pot stand dimensions for Ion stove, the version linked to above is taller and wider, for a Penny large stove.

Thanks to Sgt. Rock for his Original Ion Designs and Tests

Before I say anything more, I want to thank Sgt Rock, the creator of the Ion stove for his assistance, and for his generosity with his time and knowledge, in finally cracking the .5 oz boil barrier. Everything here is based on his work, including some tips he gave me via email which proved to be absolutely critical, plus a few pointers that might not be totally obvious from his how-tos in terms of how to make the screens and pot stands and stoves.

Stove Design Goals

Here were my design goals as they evolved over some trips using a Mark Jurey Penny Stove, in several versions, with a few heights of wind/heat screens, 5″ to 6″. Because the penny stove has some advantages in terms of speed and wind resistance that the Ion stove may not have, I will do another how to on the penny stove at a later date, but this how to is going to be about how to create a realworld stove that has the following qualities:

  1. First, and foremost: must boil water using a narrow pot, using no more than 15ml fuel.
  2. Next, must boil using standard denatured alcohols like SLX, which you can find at any hardware store and even some larger supermarkets. This is also the fuel you are most likely to actually find hiking in the US in trail towns, so making this a requirement makes sense, particularly when sgt rock noted that this is what he achieved his legendary 12ml / 2 cups boil Ion with a .9 liter wide pot, which I will discuss a bit more in the conclusion.
  3. Stove must be easy to light, and require no priming. The penny stove is not that hard to light once you learn how to do it, but it’s a bit too finicky for my taste, too much priming, and you lose fuel as it flares up, too little, and you have to redo it.
  4. Screen / heat shield must be easy to use and fit inside of pot without any excessive gymnastics.
  5. Uses a pot stand. This is a very core requirement, because almost all stoves that require priming and pressurization from the pot set on top of it are not only not super stable, but waste heat while you wait for the stove to heat up. The penny does not have this issue.
  6. As a sub-requirement, and as an outcome of approaching the 15ml goal, fuel for a week, real cooking, on a real trip, should fit in an 8oz container, ie, small, compact.
  7. To repeat, must do all this using a narrow pot (ie, a pot that is taller than it is wide), 600ml to 900 ml.
  8. Must work out of the workshop, ie, outside, in various temperatures. See fuel efficiency thread appendix on altitude and boil times/temps / water temperature.
  9. Must nullify any claimed weight advantage of using a non renewable cannister stove with higher BTU gas as fuel source.
  10. Screen must be easy to store in pot, and must allow connecting each end to the other without extra steps or tools. I used to use bolts to hold it together with wing nuts, but it was too finicky for my taste.
  11. Stand must fold up for storage in the pot without taking up any real room
  12. Light weight. But that’s a given, it’s going to be light.

Sparing you the suspense, all of these goals are now met. Short version: pick one, efficiency or speed. (However, in a future post, I will give a how-to for the amazing CHS stove, which actually is quite close to the efficiency of the ION, but almost 2x faster to boil).
Read the rest of this entry »

Alcohol fuel efficiency for backpacking stoves – ethanol vs methanol

May 12th, 2013 by h2

I’ve been working on the problem of alcohol stove efficiency in my spare time, as a hobby, to relax from more pressing regular work matters, and I finally realized, the information on the internet is not very accurate, so I’m going to work out here the basic chemistry of alcohol fuel efficiency. My starting point was the very fine article on the Ion Stove by Sgt. Rock, which set me on my quest to get the actual data as closely as I could. If I make any errors in my calculations, do please post a comment of correction and I’ll update this posting.

While I might appear to get lost in the details, let me remind you of just why alcohol stoves are so lovely: they are silent. You can use any fuel, from toxic methanol to good quality ethanol in them, and they will still work, though of course you’ll need to carry about 20% more weight in fuel if you use a primarily methanol based fuel, as you will see as we do the calculations below. See appendix 1 for fuel types and how to get them. See appendix 2 for a table of fuel use / water starting temperature for ethanol and methanol.

The key point is that there is no such thing as ‘alcohol’, there are types of alcohol, and when you learn how to use your stove, and read how people get certain efficiencies, you need to be aware of significant differences in efficiencies, for example, ethanol, at 21.1 kjoules per ml, contains a whopping 33% more energy per ml than methanol, at 15.8 kjoules per ml. And, turning it around, methanol contains only 75% of the energy of ethanol. A blend like SLX probably contains around 18-19 kjoules / ml, though it could be less.

The basics – Joules to heat 1 pound of water

To make things easier, we are going to work from 2 cups of water, 16 oz, which weighs one pound. As always, we need to be clear on the units, we’ll be using 1 pound of water because 2 cups conveniently weighs 1 pound. wikipedia tells us that:

The British thermal unit (symbol Btu or sometimes BTU) is a traditional unit of energy equal to about 1055 joules, 1.054kj. It is the amount of energy needed to heat one pound of water by one degree Fahrenheit. In scientific contexts the Btu has largely been replaced by the SI unit of energy, the joule.

Appendix 4 shows some more conversion information for energy units.

For our purposes this is convenient. So 1 kj, actually 1.054 kj, heats one pound of water 1 degree F. 1 kj is about the energy released by one wooden match burning (pdf has energy content of many things, conversion units etc). However, it’s not quite that simple, since 2 cups of water weighs actually about 16.7 ounces by weight, ie, a bit more than a pound. Since 2 cups of water actually weighs 16.7 ounces, or 1.04375 pounds, this will throw off the following numbers for 2 cups slightly, but not a whole lot. However, all we need to do is multiply the total by 1.04375 to get the amount of fuel needed for the volume 2 cups, which is easy, so that’s what we will do below.

Energy content of ethanol

Sgt Rock lists the energy content per pound of ethanol as 12,550 btus per pound ie, 12,550btusx1.054=13,227 kj, and the energy content of methanol as 10,200 btus per pound (10,750 kjoules). First let’s check this. This source gives the energy content of ethanol as 23.4 MJ per kg. This comes from the IEA. Keep in mind that you can basically never find or buy 100% pure ethanol, all ethanols you will buy contain about 5% water, so that confused the matter. This pdf from ipst.gatech.edu for example lists it at 11,500 btus per pound. So clearly the first thing to do is find out what the actual energy content of 95% pure ethanol is. The question is made more difficult by the mix of units, ie, joules/btus per gallon (a volume measurement) vs joules/btus per pound, by weight, that is. So during this process we will need to find standard units to get things consisten.

The “heat content” of a gallon of ethanol is 76,000 British Thermal Units (BTU). But 1 BTU = 1054 joules, so the energy density (by volume) of ethanol is 21.2 kilojoules per cubic centimeter (aka, 1 ml).

Since the density of ethanol is 0.789 grams per cubic centimeter, the energy density of ethanol is 26.8 megajoules per kilogram. src

Read the rest of this entry »

Sawyer Squeeze Filter Modifications Part 2 – Cleaning Syringes and Storage Bag

September 12th, 2012 by h2

The Sawyer Point One Squeeze filter (0.1 micron version) has grown to be one of my favorite pieces of gear.

There are two pages of modifications:

Ok, so you’ve done Part 1. This now lets you do part 2, and fixes what is in my opinion the single weakest part of the Sawyer Squeeze design, the backflushing syringe they include. First, the one they provide is really big. Second, it doesn’t seat nicely into the clean end of Sawyer Squeeze, you have to sort of press it on.

However, have no fear, that’s an easy problem to solve.

Changing Irrigation Syringes – On Trail And Home Use

[Update: do not follow this suggestion, I have reconsidered this question and this is a bad idea, use either 60ml syringe for maximum 2oz flow for about 1 second, or use nothing. Use of smaller syringes can lead to filter tube channeling, which is not reparable). The long tip 60ml however works very well, and is highly recommended.

I had a brain storm (too bad it was wrong, see note above), and realized I should check for smaller or better fitting irrigation syringes. That’s what that big thing is, with the plunger. After discovering that big pharmacy chains were totally useless and didn’t carry such things, I went to an old local store, Johnson’s Medical Supply in Berkeley, if you live in a larger city, you almost certainly have a true medical supply store. NOT, repeat, a junk filled big box chain place, it’s a store dedicated to only medical supply products.

Read the rest of this entry »

Simple Modifications for Sawyer Squeeze Filter – Prefilter, hose adapter, evernew water bladder

August 16th, 2012 by h2

The Sawyer Point One Squeeze filter (0.1 micron version) has grown to be one of my favorite pieces of gear.

There are two pages of modifications:

Before I get into the mods, check out this video of the Sawyer Squeeze Filter in operation out in the wilds (The Cascades, by Portland, Oregon).

You can see the modifications in action there.

Use a scoop, not the bag

Even though this seems pretty obvious, if you try to fill the dirty bag from Sawyer directly, you’ll note that unless you have a waterfall of some size, or rapids, you’re not going to get that bag filled. Unless, of course, you use a scooper of some sort. In that video, I used a trimmed down cheap water bottle, but you can use a cut off Sawyer 16 ounce bag, or your drinking cup. No matter what you do, it’s not a bad idea to rinse out the scoop with some clean water before storing it between uses.

Read the rest of this entry »

Making an ultralight priming pan for your alcohol stove

June 20th, 2012 by h2

Today I’ll show you how to make an ultralight alcohol stove priming tray for your alcohol stove. Certain types of alcohol backpacking stoves need priming, in this case, I’m using a penny stove that I made a while ago. A fine stove, although hard to make.

A priming tray makes it a lot easier to start these things up, and saves a bit of fuel, but please be careful because you are placing fuel almost directly on the ground, so make sure to clear the spot you are going to use your stove on very thoroughly to avoid fires! The tray also fits snugly under the base when the stove is stored in the pot when packed away.

Today’s project is a companion to the making a (titanium) pot stand article.

Making a priming tray is very easy, and can be done with only a knife or scissors, but you get a cleaner result with some plyers. But you can make one using just your fingers and some way to cut out a rectangle from an aluminum can. I made two, one to carry as a spare since it’s so light it might blow away by accident.

This tray weighs a mighty 0.3 grams. So I made an extra one to keep as a spare. The entire setup (stove, stand, tray) in the above picture weighs exactly 28 grams, ie, just under an ounce. But I do carry a spare priming tray and a spare penny, since penny stoves require pure copper pennies, pre 1982 that is, to work properly, newer ones are too light.

Tools and Materials

This is easy, and you can get the stuff anywhere.

  1. A rectangle of aluminum from a can, about 1.75 (1 3/4) inch by 1.25 (1 1/4) inch. This holds plenty of alcohol to prime a stove. Don’t use aluminum foil, it’s too flimsy and might start leaking out alcohol on the ground after a while.
  2. Scissors to cut this rectangle. Or a knife, if you are going ultralight and have no scissors.
  3. Plyers. I used two kinds, regular flat ended and needle nose, but you don’t need that unless you have them lying around, which of course any self-respecting do it yourselfer should.

That’s it, I told you this would be a basic project.

How to Make the Priming Tray

Here’s the steps, in pictures, to make the tray. Explanations follow each picture.

Read the rest of this entry »