Polycryo ground sheets – cross linked polyolefin

January 26th, 2015 by h2

I'd noticed the difference between different heat shrink film (aka, polycryo) a while back while cutting out ground sheets for two tents, one was using Gossamer Gear ground sheet, which was slightly stiff and felt very strong, and has held up very well now over many long trips, and the other made out of the Ace Hardware store bought film (comes in a roll), which felt soft and thinner. Now I see why, it was thinner, and didn't feel like it would be as durable or puncture resistant.

Keep in mind, Ace hardware stores are very helpful and can just order the thicker polycryo for you if they store doesn't carry it, you just need the part number: 5604277

BPL thread

Not that anyone is all that interested, but i found out that the 84 in X 120 in and 1.5 (as of 2017-01-25, was 1.2 mil previously) mil thick window insulation sold online at Ace hardware IS indeed cross linked polyolefin (in BPL slang, "polycryo").

Previous backpackinglight.com thread on this:
another BPL polycryo thread

Doing a little research and have identified the following brands and thicknesses.

Ace Hardware – Most kits are .6 mil, but they do have 1.5 mil outdoor kits available, item number 5604277. Check your store first, sometimes they have them, sometimes they don’t. Probably more likely in winter months. The 1.5 mil is quite thick and strong.

Scotch – 3M – Indoor and outdoor kits are .75 mil

Dennis – interior are .6, exterior are 1.2

Duck – Exterior kits are .7 mil

Frost King – They replied to my email and say the exterior kits are .75 mil

84 in X 120 in (or 62×210) available now, 2017-01-22, and 1.5 mil thick window insulation sold online at Ace hardware IS indeed cross linked polyolefin.

Here is it:

Read the rest of this entry »

Titanium Grades (for your ultralight projects)

October 8th, 2014 by h2

Ok, ok, I know, you are saying, who cares? But I was curious about titanium wire grades (for my ultralight titanium pot stands) so I found this chart here.

Element Composition,%
Grade1 Grade2 Grade3 Grade4 Grade5 Grade6 Grade7 Grade9 Grade11 Grade12
N max 0.03 0.03 0.05 0.05 0.05 0.03 0.03 0.03 0.03 0.03
C max 0.08 0.08 0.08 0.08 0.08 0.08 0.08 0.08 0.08 0.08
H max 0.05 0.015 0.015 0.015 0.015 0.015 0.015 0.015 0.015 0.015
Fe max 0.2 0.3 0.3 0.5 0.4 0.3 0.5 0.25 0.2 0.3
O max 0.18 0.25 0.35 0.4 0.2 0.2 0.25 0.15 0.18 0.25
Al 5.5-6.75 4.0-4.6 2.5-3.5
V 3.5-4.5 2.0-3.0

Note that lower grades are really soft, so I wanted to know what grade 5 is. Now I know.

Further, from wikipedia we learn:

Grade 1 is the most ductile and softest titanium alloy. It is a good solution for cold forming and corrosive environments. ASME SB-265 provides the standards for grade 1 titanium sheet and plate.[4]

Grade 2 Unalloyed titanium, standard oxygen.

Grade 2H Unalloyed titanium (Grade 2 with 58 ksi minimum UTS).

Grade 3 Unalloyed titanium, medium oxygen.

Grades 1-4 are unalloyed and considered commercially pure or “CP”. Generally the tensile and yield strength goes up with grade number for these “pure” grades. The difference in their physical properties is primarily due to the quantity of interstitial elements. They are used for corrosion resistance applications where cost, ease of fabrication, and welding are important.
Grade 5, also known as Ti6Al4V, Ti-6Al-4V or Ti 6-4, is the most commonly used alloy. It has a chemical composition of 6% aluminium, 4% vanadium, 0.25% (maximum) iron, 0.2% (maximum) oxygen, and the remainder titanium.[5] It is significantly stronger than commercially pure titanium while having the same stiffness and thermal properties (excluding thermal conductivity, which is about 60% lower in Grade 5 Ti than in CP Ti).[6] Among its many advantages, it is heat treatable. This grade is an excellent combination of strength, corrosion resistance, weld and fabricability.

“This alpha-beta alloy is the workhorse alloy of the titanium industry. The alloy is fully heat treatable in section sizes up to 15mm and is used up to approximately 400°C (750°F). Since it is the most commonly used alloy – over 70% of all alloy grades melted are a sub-grade of Ti6Al4V, its uses span many aerospace airframe and engine component uses and also major non-aerospace applications in the marine, offshore and power generation industries in particular.”[7]

“Applications: Blades, discs, rings, airframes, fasteners, components. Vessels, cases, hubs, forgings. Biomedical implants.”[5]

Now I know, that’s why people use Grade 5, and that’s what I am looking for. Specifically, 0.08″/2mm titanium wire. They call it wire rather than rod when it’s thinner than about 0.125″ I believe, give or take. Anyway, for stuff of about 2mm it’s wire, no matter what the cutoff point.

Note: it’s really hard to find grade 5 2mm titanium online, but you can find it if you google for titanium bike spokes, they run about $2 each, make sure to get longer ones, most are for bmx bikes, and are too short for things like pot stands etc. 14 gauge spokes are 2mm which is about 0.08″. Spokes will be made out of very strong alloys.

Protecting silnylon against misting in heavy driven rains

August 19th, 2014 by h2

I came across this very good explanation of how to add a bit more silicone to your silnylon tent/tarp to protect against heavy driven rain, which causes inner misting. I was not completely sure that this actually happens, until my last trip, where it clearly happened. All doubt was removed in my case because I had pitched the tent on a dry spot, relatively, thunder was booming in the distance, then it started to rain, then almost immediately, a heavy hail (3/8 inch or so), I got in my tent, zero time for condensation to form, and the misting started instantly, it’s very clear and defined, nothing to do with condensation, so if you read people trying to pretend this phenomena is just inner condensation getting knocked off by the outer rain, they don’t know what they are talking about, but probably think they do.

In an unrelated heavy rain in Norway discussion thread Eric Blumensaadt gave this excellent short summary on how to treat your silnylon to fix the misting problem, I’ve read several, and this one seems to be about perfect, thanks.

Re-coat the silnylon tent with a 5:1 ratio by volume of 5 parts of odorless mineral spirits to 1 part clear GE Silicone II (or European equivalent). Place in a suitably sized jar with a tight lid. Shake well to mix and shake every 5 minutes while using.

Apply in sections with a very short nap, narrow paint roller – pour small amounts in a roller pan. You can also use a fine bristle brush. Spreading the tent sections on a smooth top table is far better than using the floor.

BE SURE to wipe the excess off each section immediately with a heavy duty paper towel (“shop towel”). Rolling on the mix is faster and gives a more even coat than brushing. Wiping immediately after leaves only the necessary amount on the silnylon, thus reducing weight AND GREATLY REDUCES DRYING TIME by days. Silnylon floors or ground cloths (“footprints”) can be coated twice using this method for a heavier coating.

BTW, this procedure will seal the tent exterior seams but I would recommend also coating the interior seams as well. If seams ever leak after this treatment (doubtful) use a 3:1 ratio of mineral spirits to clear silicone caulk for re-sealing. Do NOT wipe this seam seal treatment. Just let it dry in the hot sun. The Netherlands does have hot days, right? My experience with Dutch weather was in late October when it was cold and rainy.

I didn’t want this little gem to just vanish in the never ending churn of gear talk etc on Backpackinglight.com, so I am saving it here so it doesn’t get lost.

Technically, I believe you can use Coleman white gas type fuel instead of the mineral spirits, and I believe silicone cures better in humid climate, though I’m not positive about that. Also of course, it’s hard to use rollers if you don’t have a big work space.

Making a Simple Lightweight Backpacking Alcohol Stove Wind-Heat Screen out of Flashing

August 15th, 2013 by h2

This article is part of a related series of fuel/stove articles:

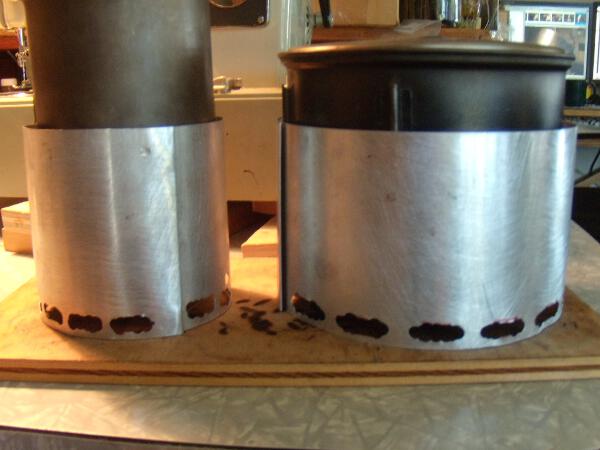
One of the keys to efficient boiling/cooking with alcohol stoves is the stove screen/heat shield. There are several components to constructing an efficient stove system, and the most important one is the wind/heat screen.

This screen will work well with Sgt. Rock’s Ion stove or Mark Jurey Penny Stove, or most other types, and should get you close to the maximum efficiency you can get with a flat rolled screen. For other options, see cone type screens and bent in screens (like FlatCat Gear uses). I wanted something a bit simpler than these types of screens however, one that rolls up neatly inside your pot, slots into itself with no weird or unwieldy connector methods.

I have to thank Sgt. Rock, who helped me figure out some of the intricacies of making an efficient stove. His Ion stove / screen / stand system still remains probably the most efficient and simple setup anyone has ever created.

This design is tested fairly extensively and is a little bit different, and more sturdy, than what Sgt Rock has on his site, but the core ideas are the same.

Core Concepts and Goals of Efficient Screens

The ideas behind efficient screens are not that complicated, but some are a bit counter-intuitive.

  • Screen should be quite close fitting, about 1/4″ (6mm) from side of pot gap.
  • Screen should not be too tall. For most pots, 4″ (10cm) is about right.
  • Critical: enough air must enter into burning chamber to allow fuel to not overheat. This is where many screens fail, including most of my earlier attempts, but I did not realize this was the cause. I discovered this by long trial and error, primarily by lifting up fresh, non-holed screens with paper clip legs, then noting that gave me the best efficiency by far of all methods I had tried. Then it was simple math to calculate how many total square inches of air inlet that roughly 1/8″ to 3/16″ (3-4mm) created, then to duplicate that with air holes. The reason you see somewhat jagged airholes on the following completed pictures is that I do not have a punch that creates long air holes, so I formed them by punching out holes, cutting between them with small scissors, then punching a few more pieces off. This creates a few issues with wind, that are however easily resolved.
  • The real key: the screen acts much more like a piston cylinder/carburator than a wind screen. The trick is to get the optimal air/fuel mixture, and to create the best burn chamber possible. This was the hardest point for me to understand, and it took a great deal of testing to confirm what sgt rock had told me via email about this question.

Furthermore, based on some touchy and slightly irksome designs I’d used before, I had the following practical goals for this screen design:

  • Screen should be made out of aluminum flashing, which is easy to get, and very strong, and can be stored inside the pot easily by rolling it up. This material is springy enough to where it generally opens fine to its desired diameter.
  • Screen should have a simple, essentially foolproof method of connecting the two ends. Since I’ve been sewing a lot, a bit of trial and error showed me that a basic flat felled type connection was perfect.
  • Screen should not require awkward storage methods, like most cones do, and should above all be as simple as possible, yet yield the most efficient boils possible, on par with something like the Caldera Cone.

After a decent amount of testing, here is a how to on constructing this screen.
Read the rest of this entry »

Fuel Consumption and Pack Weight for Alcohol – Esbit – Canister – White Gas Backpacking Stoves

August 1st, 2013 by h2

There’s a lot of myths about fuel/stove weight for trip lengths of various days. This page compares consumption weights between several types of setups, over different time frames, using an easy to read table of weights per day/night of the trip, broken into stove / fuel types. As you will see in the table below, basically, an efficient alcohol/esbit stove system will always weigh less at all points of the trip, no matter how many days. This is because the container for canister stove gas weighs about the same as the gas, for 100gm containers, and about 2/3 of the net gas weight for 220 gm canisters.

This article first compared just gas canister to alcohol, but has been expanded to include Esbit and White Gas stove systems.

Of course, all this ignores the sheer silence, clean burning, and beauty of an alcohol stove, plus of course the simplicity, and super light weight of any decent alcohol stove setup, which is the real reason I like these things.

-> Go directly to fuel consumption/carry weight tables.

Basic Fuel Consumption/Pack Weights

See the full tables for fuel consumption/pack weight per day.

Short version, assuming 2 cups boiled two times a day, you will never carry more weight with an efficient alcohol/esbit stove, and you will only carry more weight with a less efficient one on the first day of a 12 day trip. You will basically never make up for the heavier canister container weight, and the heavier stove weight, and you will always never really know how much fuel you truly have left with the canister, whereas with the alcohol, you can very precisely measure out the fuel per boil, knowing exactly what you need to bring and what you can use per day.

Basic testing / efficiency parameters

Alcohol

Alcohol stove comparisons in this chart show two types, one, a very easy to make, fill, and light Ion type stove, and two, a less efficient stove, but faster boiling, like the Penny stove, that requires about 2/3 fluid ounce to boil 2 cups of water. Since a lot of people still use these less efficient alcohol stoves, I thought it would be fair to include that type in the weight comparisons.
Read the rest of this entry »